


Associate Editor
There is no one-size-fits-all equation for determining punching tool life. It can be tricky for experts to determine the exact number of punches an operator can expect from a tool.
According to Nick Kassermelli, business unit leader-punching and stamping division at Wilson Tool International’s Scarborough, Ont., office, it all depends on the application. He adds that the type of material being punched, the type of material the tooling is made from, tonnage, tool maintenance, and coating all affect the longevity of a tool and come into play when calculating tool life.
“I’ve had tools where I’ve exceeded a million hits without a problem,” said John Ripka, application technician, Mate Precision Tooling, Anoka, Minn. “I’ve also had tools where I haven’t even gotten close to that. A lot of it has to do with tool application and maintenance.”
To get the most out of your punching tools, avoid tool wear, and punch proper shapes, take a look at the following five factors.
For Ripka, the biggest mistake fabricators make is not ensuring their turret stations are properly aligned and in good working order, not only positionally but angularly towards what is being punched. If the station is in good alignment but is turned by half a degree, nibbling or punching out a straight line, say with a rectangular tool, will result in a saw-tooth effect with every hit made. Over time, this saw-tooth effect will start to cause uneven wear on the tool, breaking down the cutting edge.
“You want to avoid nibbling if you can,” said Ripka. Nibbling creates side loading, where the punch starts to come down and only a portion of the tool hits the material. Most of the tool is left unsupported, which causes the tool to pull to the unsupported side, causing a breakdown of the punch point.
If you are going to nibble, experts advise using fully guided tool with a stripper designed with a tighter clearance to keep the punch point vertical when penetrating through the sheet. This is especially good for small holes in thick material or nibbling.
“The upper and lower turret pretty much need to be in perfect alignment with each other to avoid uneven or premature tool wear,” he added.
“Having the right clearance is critical,” said Kassermelli. “It has a huge bearing on the stress factor on the tooling, and not to mention the finish on the hole itself.”
If you notice the appearance of burr, this is a good indicator that the die clearance is incorrect. According to Kassermelli, too much die clearance will cause the material to roll over and stretch, creating a downward edge or burr. If the clearance is too tight, this can cause extreme stress on the tool, with the punch stripping out of the pierced hole.
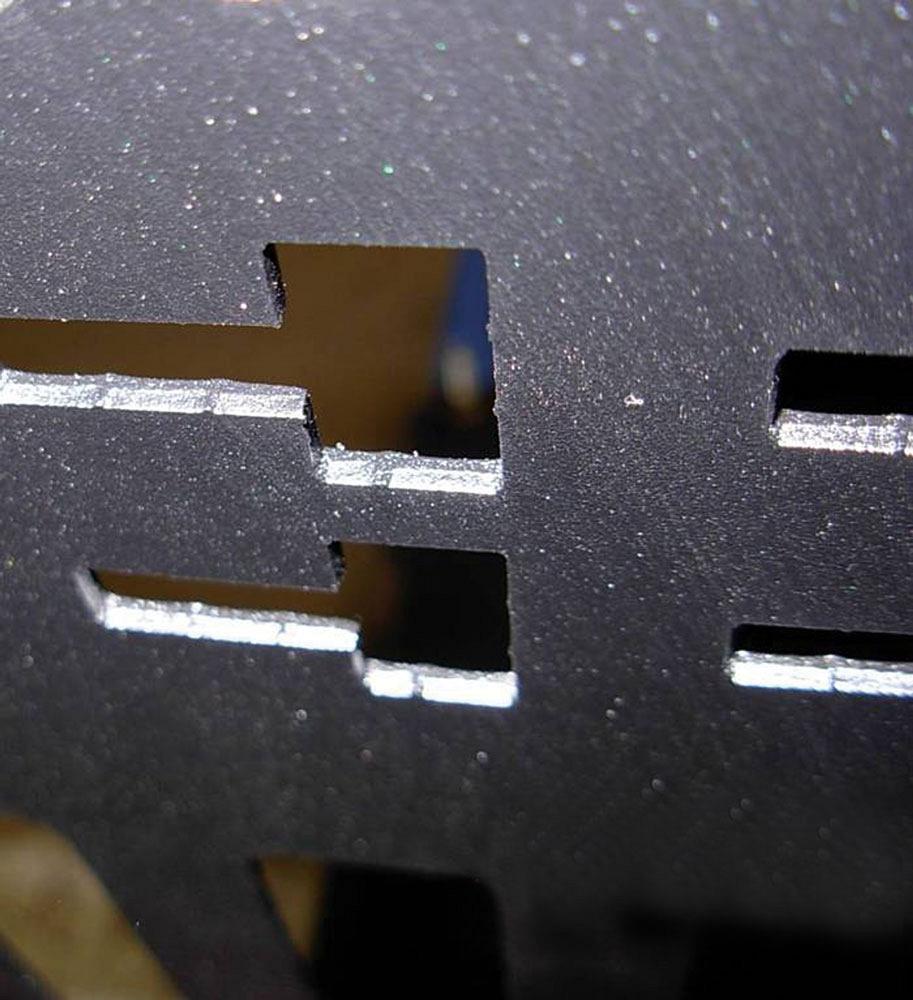
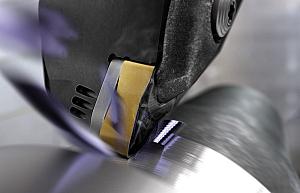
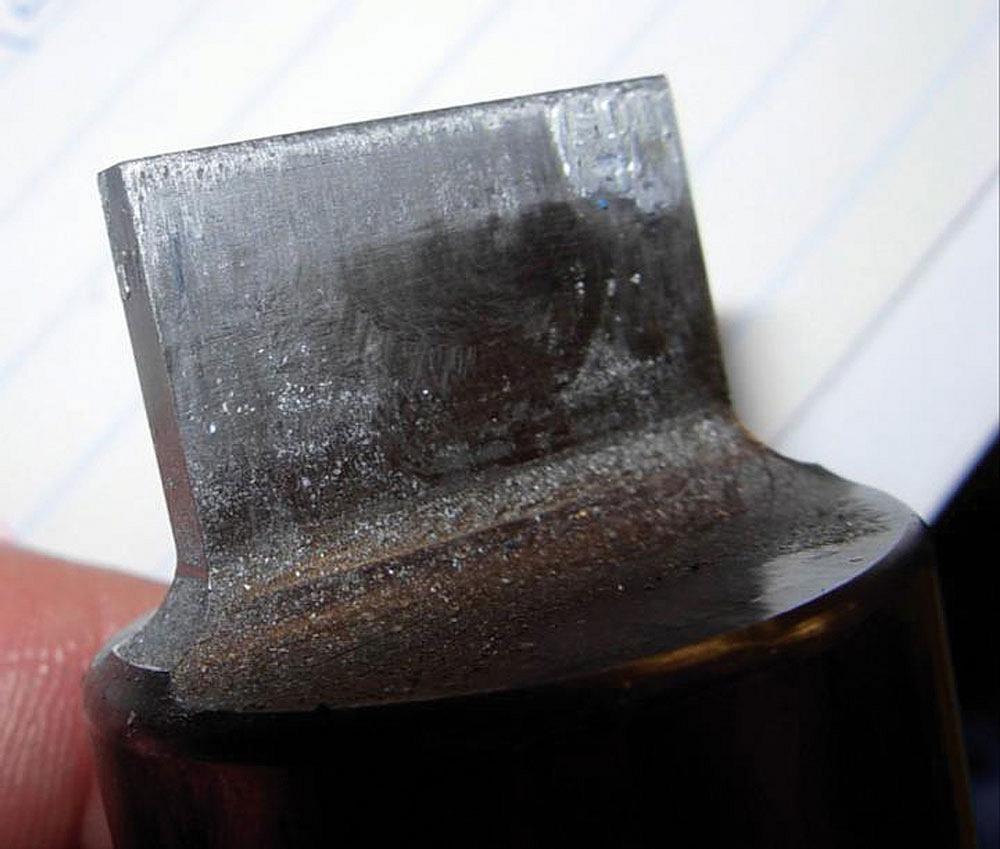
In this nibbling application, the tool and hit used were too aggressive for the material causing an irregular edge and putting too much stress on the tool. Photo courtesy of Mate Precision Tooling.
“When you have proper die clearance, you get better stripping and a smaller burr,” explained Ripka, who added that die clearance is material-dependent. With stainless, fabricators would typically adjust the die clearance to 25 per cent of the material thickness. With mild steel and some types of aluminum, the die clearance is less than stainless, about 20 per cent, depending on what is being punched out.
Kassermelli explains that adding a coating is one of the easiest ways to get the most out of your punching tools. Several different tool treatments and coatings are available, such as a nitride treatment in which nitride is infused into the punch point.
“That helps with making the punch more slippery as it is punching through and pulling out of the material,” said Ripka. “Coatings such as zirconium, titanium, and nitride are applied in multiple, thin layers onto the punch point. That adds lubricity and helps keep the punch point cooler for high-hit applications that are subject to heat buildup on the punch.”
Coatings and treatments are a great way to extend punch life and decrease galling. Galling occurs when the punch point heats up and the material around it melts to it and builds up on the punch point.
According to Ripka, when you do encounter galling, you want to take it off using a fine abrasive, grinding vertically to the punch point so that it goes in the same direction as your punch would go in and out of a sheet. Leaving the galling on creates more material to grab onto. It closes or shrinks the opening between the punch and the die, so you are getting a tighter fit than you want to have with the die clearance needed.
Having a sharp tool can make all the difference in punching hole quality. According to Kassermelli, the easiest way to know when your tool needs to be sharpened is by feeling it. If it’s dull, then it needs sharpening. He also notes that you can tell by the quality of the hole if there is rollover on the edge of the punch, which could be an indication of a dull tool. A distorted hole also can show signs of the punch breaking down. For example, a round hole that starts looking egg-shaped could indicate that one side of the tool is breaking down before the other.
“You can hear the difference when the punch is hitting a sheet when it is starting to get dull,” added Ripka. He recommends that fabricators sharpen their tools more frequently rather than punching away until they are extremely dull.
According to the experts, it’s better to sharpen more often and take minimal material off each time. This will drastically increase tool life. For example, Ripka said that in side-by-side testing of the same tools in the same application, sharpening more frequently can improve tool life exponentially.
For sharpening, using a good coolant is essential. If you sharpen without coolant, the heat buildup can change the characteristics of the material, weakening the tool. And use a good grinding wheel and consistent speeds to feed the tool in and out.
“Once you’ve finished sharpening, it is essential that you demagnetize your tools,” said Ripka. “When they become magnetized, they attract any carbon-type debris. Any extra dust or debris on the tool increases the amount of wear. You are essentially punching through extra garbage.”
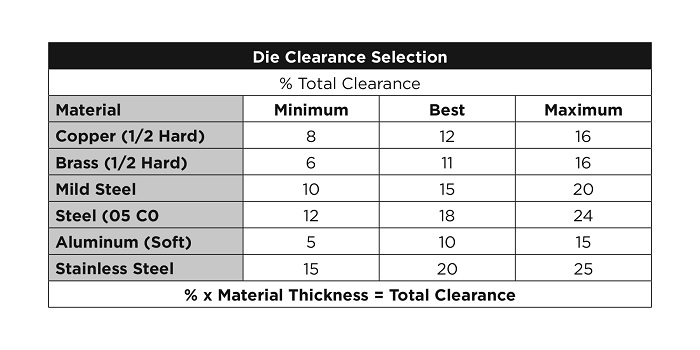
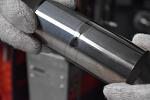
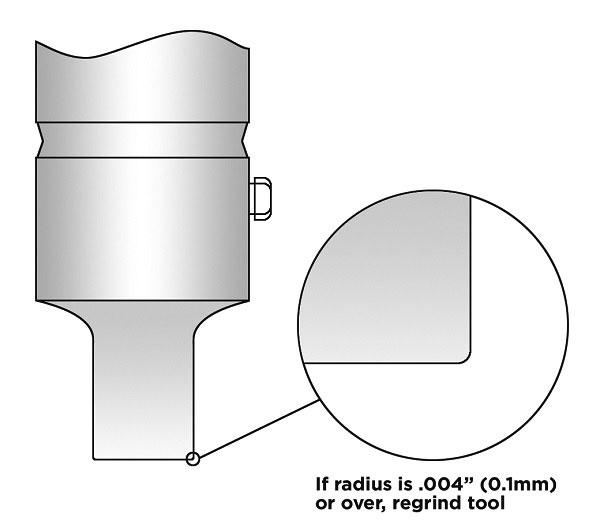
Correct die clearance depends on the material type and thickness. Photo courtesy of Wilson Tools.
After tool sharpening, you may see a burr at the edge of the punch point. To get rid of this, use a soft abrasive stone to break off the material. It will leave a clean edge with a minimal radius. With dies, after sharpening, use die shims to make sure they are set back to right height to ensure you have the right punch penetration all the way across the board.
“If you have them, use punch lubricators,” said Ripka. “If not, use lubrication on the sheet during punching, especially when punching a lot of holes in a small area. Not everyone will put lubrication on the sheet when they run parts, but it will help with tool life.”
Some fabricators will run their punches without lubrication, which can reduce life expectancy of the tool by up to 60 per cent and cause galling when working on softer materials. Properly lubricated punch tips also will keep the punch from overheating.
Beyond these five factors, make sure you have a proper storage system for your tools and dies to ensure they are not rolling around and getting scratched. Scratches and gouges on the tool will be mirrored in the components they are fitting with.
Associate Editor Lindsay Luminoso can be reached at lluminoso@canadianmetalworking.com.
Mate Precision Tooling, www.mate.com
Wilson Tool International, www.wilsontool.com


Keep up to date with the latest news, events, and technology for all things metal from our pair of monthly magazines written specifically for Canadian manufacturers!
Start Your Free Subscription
Easily access valuable industry resources now with full access to the digital edition of Canadian Metalworking.
Easily access valuable industry resources now with full access to the digital edition of Canadian Fabricating & Welding.