- FMA
- The Fabricator
- FABTECH
- Canadian Metalworking
Measurement Doesn’t Have to Be Squeaky Clean
Shop floor options can satisfy precision part requirements
- By Sue Roberts
- March 15, 2013
- Article
- Measurement

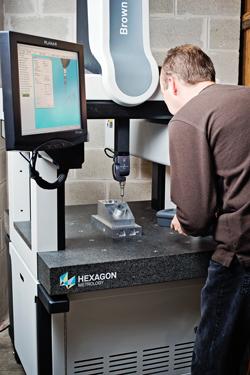
The Brown & Sharpe 4.5.4 SF, available from Hexagon Metrology, combines thermal compensation, covered ways, and built-in vibration resistance in a compact unit on casters for easy positioning throughout a shop. Photo courtesy of Hexagon Metrology.
As the complexity of machined parts increases, it takes more than the right equipment, tooling, and operators and producing parts to print to get the job done. The burden of measurement and supporting documentation for those parts comes right along with the multiple holes, recesses, bevels, contours, concentricity, and every value-added feature. It takes the ability to accurately measure and compare those readings to their nominal values in a precise and well-documented manner.
Building and equipping a quality lab with air-bearing coordinate measuring machines (CMMs) can be daunting for a small operation. But the investment involved with a clean room is not always needed to get into the precision parts game. Metrology equipment and tools are available to provide precise measurements in very nonprecise environments. Many of these tools and options are priced to fit the capital budget of a small-shop owner.
Hard-bearing Equipment
Eric Bennett, CMM bridge machine product manager for Hexagon Metrology in North Kingstown, R.I., said that shop owners have a choice of hard-bearing measurement equipment that is robust enough to handle extremely harsh environments. “While these machines are not quite as accurate as air-bearing bridge machines in a laboratory environment, they come close. And the added advantage of operating on the shop floor can make a hard-bearing CMM the right choice for many operations.
“We put them shoulder-to-shoulder with the machine tools on the shop floor. They become just another operation in the machining process – an operation to verify that a feature is correct before the part moves on to the next process. In-process measurements can be critical: placement of a second feature might depend on the first one being within tolerance,” Bennett said. “What’s more, by proliferating inspection throughout the shop, you do away with an inspection bottleneck.”
For example, the Brown & Sharpe 4.5.4 SF, named for its compact size of 355 mm wide by 514 mm deep by 353 mm high, is a small CMM with thermal compensation, covered ways, and built-in vibration resistance. Casters allow it to roll from cell to cell on the shop floor as measurement needs change. Manual, motorized, and analog scanning probes can be used to communicate touch point measurements back to the control.
“Probably a large majority of measurement tasks can be accomplished with the less expensive single point probing,” Bennett said. “But if you need to know how flat or how round a feature is, you need many, many more data points, and continuous contact probing provides the faster, more accurate measurement. If you were to take the amount of data you need to make a good measurement using a touch trigger probe, you could be there a long time, pecking away at the part.”
Measurement Software
Steven Weeks, metrology products manager for Heidenhain Corp., Schaumburg, Ill., said, “As parts get more complex, the need to provide measured results increases. To ensure products and processes are in control, properly equipped touch probe-based CMMs, as well as video-based equipment, can use software to meet these requirements.”
Heidenhain’s latest version of the PC-based QUADRA-CHEK® metrology software, the IK 5000, provides advanced functionality for shop floor CMMs. The 3.0.0 release performs 2-D and 3-D measuring tasks on new machines or as a retrofit.
“CMM users can access profiling capabilities for measurement and graphic evaluation of 3-D contours using multisensor and tactile measuring machines. This profile measurement option can import a STEP or IGES 3-D CAD file and compare it with an actual measured part,” Weeks said. The 3-D profile includes a feature for probing points perpendicular to the surface on DCC CMMs. Support for setting up two-, four-, and six-bay probe racks is available.
The new version has the ability to run Windows® 7 64-bit operating systems and support for an analog frame grabber, DALSA® PC2 Express card, for video-based equipment. This provides an analog image and video edge detection tools for PCs using Windows XP or Windows 7. The output of a camera hardware trigger, for digital camera users who might be measuring very small parts, synchronizes axis position and the image. Support of ISO 286-2 tolerances, import of measured points into a 2-D profile within a part program, and rectangular-shaped feature measurement aid verifying of precision dimensions.

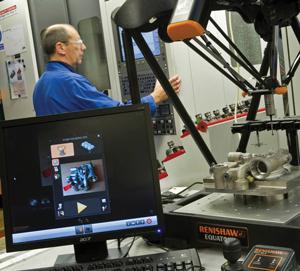
The portable Renishaw Equator uses a comparative technique for part measurement. It can be programmed to switch between multiple parts. Photo courtesy of Renishaw.
Programming is designed to minimize time invested in training. “By adding this tool to multiple machines--CMMs, optical comparators, or microscopes—cross-training among inspectors is easy,” said Weeks. “If somebody knows how to use a CMM with one of our products on it, they’ll be able to inspect parts on other machines in different applications.”
A Different Look
The Renishaw Equator™ shop floor measurement system uses a two-part, comparative methodology to measure in-process or postprocess part accuracy. The technician contact scans the master part to establish the nominals for production part comparison, and then uses the master part to calibrate the system. A low density of points can be used for parts with only size and location features, or a high density of points can be used to compare full forms or highly complex components.
“The Equator uses the comparative measurement technique,” said Dafydd Williams, director and general manager, Renishaw Canada, Mississauga, Ont. “You start by creating a master part using a CMM to measure the component relative to the nominal CAD model and produce a simple, text-based calibration file. That file is then transferred to the flexible gauge. By using a CMM to make this measurement, you seal up the accuracy of your CMM in the master component. Then you measure the same part on the gauge to calibrate the system. Subsequent parts are compared to the calibrated part.” A third party can be used to generate the initial calibration if a CMM is not part of a shop’s equipment.
With the comparative technique, if the shop floor temperature shifts beyond a set tolerance, the master part can be remeasured to calibrate the gauge to the new environment.
Renishaw’s MODUS™ software integrates with CAD and SPC systems and provides results in the form of dimensional data so it is not a pass/fail determination. However, a shop floor gauging interface can be used when a pass/fail determination is sufficient.
“Automobile OEMs are releasing new models at a rate never seen before. Engine components are constantly changing for efficiency or emission gains. Here, having the flexibility to be able to reprogram and reuse your investment can be positive for any shop,” Williams said.
Metrology equipment and tooling suppliers are staffed to review CAD files or prints to determine what measurements, accuracy, equipment, and tools can help a shop move into precision part production. No clean room? No problem.
subscribe now


Keep up to date with the latest news, events, and technology for all things metal from our pair of monthly magazines written specifically for Canadian manufacturers!
Start Your Free Subscription- Trending Articles
- Industry Events
MME Saskatoon
- May 28, 2024
- Saskatoon, SK Canada
CME's Health & Safety Symposium for Manufacturers
- May 29, 2024
- Mississauga, ON Canada
DiPaolo Machine Tools Open House 2024
- June 4 - 5, 2024
- Mississauga, ON Canada
FABTECH Canada
- June 11 - 13, 2024
- Toronto, ON Canada
Zoller Open House & Technology Days 2024
- June 12 - 13, 2024
- Ann Arbor, MI


