- FMA
- The Fabricator
- FABTECH
- Canadian Metalworking
Spatial Profiling
Automated edge profiling and vision inspection optimize blade production
- February 15, 2012
- Article
- Metalworking
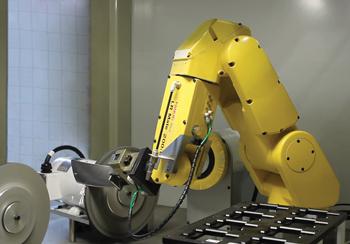
This automated blade profiling system integrates all the required abrasive wheels needed to perform the profiling.
Robotic finishing is about more than putting the final touches on a part.
To ensure part quality and process repeatability, a robotic finishing system has to be able to adapt itself to each part and to the variability in that part. Many different tools can be used to achieve these goals including force feedback components, laser sensors, vision systems, probing, and closed-loop machining systems.
A user-friendly interface and offline programmability are also important.
Once the investment is made in an automated finishing system, the manufacturer can expect benefits such as reduce labor costs, improved part quality and consistency, improved ergonomics and safety, and increased throughput.
Another benefit, according to Eric Beauregard, CEO of AV&R Vision & Robotics, a company that specializes in robotic finishing and automated visual inspection systems, is reduced abrasive use. Optimization of the process can save up to 75 percent of abrasive costs. The material handling process may benefit too.
“Every time you handle critical parts, you have a potential of scratching and damaging some pretty expensive parts. By using robotic technology you reduce this damaging handling by 10 to 15 percent,” explained Beauregard. “However, the biggest ROI for customers comes from the consistency of the result that this kind of system ensures. The whole blade finishing process can be redefined with this technology, and as a result, the user experiences an increase in throughput and a decrease in the costs [associated with] poor quality.”
This Montreal-based company, which designed its first fully integrated robotic finishing system in 1997, creates systems that help to optimize the manufacturing of critical parts for gas turbines. AV&R’s robotic finishing systems perform complex machining operations such as deburring, profiling, polishing, and blending. Its 2-D and 3-D automated visual inspection systems inspect gas turbine parts such as blades, vanes, and blisks to find defects like dents, pits, and scratches. The company is a National Instruments certified alliance partner and is a Level 4 authorized integrator for FANUC Robotics.
AV&R’s ultimate goal is to combine its two areas of expertise in one automated system. This system would finish a part and perform its final surface inspection. Recently, the company designed a system that creates high-precision elliptical profiles on blades and vanes within a 50-micron tolerance of the engineers’ nominal design. It incorporates both adaptive and closed-loop capabilities coupled with final leading and trailing edge inspection.
A proper leading and trailing edge profile reduces fuel consumption in the power plant. The cell can be used to create leading and trailing edge shapes on new blades and to repair blades during their service life.
Components that typically require leading and trailing edge profiling are compressor blades and variable vanes, both within a 50-micron tolerance.
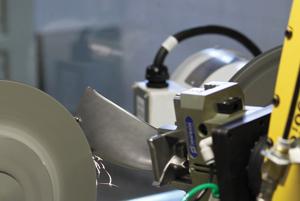
Robotic finishing systems perform complex machining operations such as deburring, profiling, polishing, and blending.
“Blades and vanes have specific challenges,” explained Beauregard. “You often need to adjust the material removal and tooling to [a specific] location on the part. Their various elliptical shapes and material composition also impact the scope of work to be performed.”
Until recently this type of work would have been done manually.
“An OEM customer or blade supplier had, until recently, no other choice due to the complexity of theses blades. Now design engineers can optimize their blade designs to achieve better performances, such as better fuel consumption and longer time on wing,” said Beauregard.
An automated blade profiling system integrates all the required abrasive wheels needed to perform the profiling within a closed cabinet, in which the robot manipulates the blades or vanes. Typically, the precise positioning requirements for aerospace industry parts typically used to eliminate the use of robot positioning devices because they could not deliver the required tolerances. A combination of complex software algorithms and a compliance system that features feedback sensors that are both adaptive and closed-loop have changed that. The addition of a vision system that compares the CAD drawing to the real part in the cell is the final touch.
“The unit will work to get the part done within the tolerance required by double-checking itself with the inspection device if required,” said Beauregard.
Each part inherently has variations resulting from the production process that is different from the required final tolerance. This means that fixed machining parameters cannot always be used.
Adaptive processing automatically calculates machining parameters according to the specific geometry of each part. This allows for parts to come into the cell with variations and leave with consistent results.
In some cases, closed-loop machining also can be used. After the adaptive profiling, the part is taken to the inspection device. Thanks to the feedback this device provides, the profile can be adjusted automatically if required.
“This closed-loop capability can be useful for blades that are refurbished, because every blade coming into the system will be completely different,” said Beauregard.
If the part is outside preset tolerances, the cell sends an alarm signal and the operator can then investigate the upstream issues and save precious time and dollars.
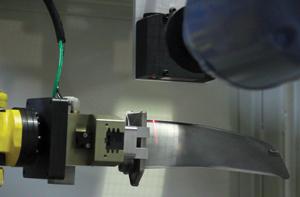
After profiling, the part is taken to the inspection device. Thanks to the feedback this device provides, the profile can be adjusted automatically if required.
Part Inspection
Traditionally, inspection is done manually with an optical comparator, which has a high potential for inaccurate readings, according to Beauregard.
“To be most efficient, it is important to measure and meet tolerances as early in the process as possible,” he said. “It is better to catch a problem before a lot of value has been put into the part.”
Today, visual inspection of parts is done manually, and benefits of an automated visual inspection system typically include:
- Elimination of human subjectivity
- Complete inspection with guaranteed results
- Feedback on the process quality
- Higher production rates
- Elimination of the possibility of a nonconforming part being shipped
Automated visual inspection systems inspect a part’s surface to ensure it does not have defects such as dents, pits, and scratches. In the event that a defect is found, the part may need to be reworked or even scrapped.
subscribe now


Keep up to date with the latest news, events, and technology for all things metal from our pair of monthly magazines written specifically for Canadian manufacturers!
Start Your Free Subscription- Trending Articles
- Industry Events
MME Saskatoon
- May 28, 2024
- Saskatoon, SK Canada
CME's Health & Safety Symposium for Manufacturers
- May 29, 2024
- Mississauga, ON Canada
DiPaolo Machine Tools Open House 2024
- June 4 - 5, 2024
- Mississauga, ON Canada
FABTECH Canada
- June 11 - 13, 2024
- Toronto, ON Canada
Zoller Open House & Technology Days 2024
- June 12 - 13, 2024
- Ann Arbor, MI


