- FMA
- The Fabricator
- FABTECH
- Canadian Metalworking
Tool presetters increase productivity
ZOLLER explains how presetting can maximize quality control.
- By Canadian Metalworking
- April 8, 2015
- Article
- Measurement
When it comes to tool room quality and management, presetting is one way to increase profit and boost productivity. Manufacturers are constantly trying to improve cycle times, lessen down times, and enhance the production process. One of the first thoughts is often the need to upgrade existing equipment. However, purchasing a presetter machine can make a difference, and is often the less expensive option to streamline the manufacturing process.
Canadian Metalworking spoke with ZOLLER, a German-based manufacturer of inspection and measuring technology, to find out what presetting can do to maximize quality control.
What are questions to help choose the right presetter for the tool room?
There are several important specifications to remember when choosing a new piece of equipment. It helps if you ask yourself important questions that can determine the best options for your needs.
What kind of tools are in use in your production? Are you a tool manufacturer or do you want to preset your machining tools? Do your tools have special geometries which need to be measured, for example hob cutters, helical tools or shrink fit tools?
Do you need a presetter placed right next to your CNC machine or do you have a climate measuring chamber? Do you need to manually measure the most important functions only (e.g. measuring of length, diameter) or is there the need for a fully automatic solution which fulfills all manufacturing needs?
What are the advantages of having a tool presetter?
Primarily, you are faster. Your tools are set and measured while your machine is producing without any downtime. Furthermore, you decrease your waste. Due to correct presetting, you produce 100 per cent correct parts.
In summary, precisely measured tools, optimized machine uptimes and longer tool service lives make sound financial sense.
What factors affect measurement accuracy on a presetter?
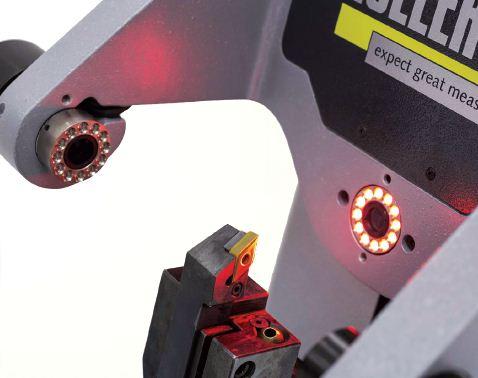
Of course, a high-quality spindle is of high importance. If a tool is not clamped correctly, this causes measuring errors and leads to inaccurate presetting and increased waste. Moreover, brand name products, special cameras for the measurement in incident, and transmitted light are crucial for the measuring success as well as an intelligent vision system. The combination of brand products, a stable housing, the spindle and of course a correct calibration by the assemblyman is the basis for quality in presetting.
What are key features of the presetter?
There are several important features to look for when purchasing a presetter. Here are things to explore:
- Stable housing
- Image processing technology
- Spindle for tool clamping
- Z and X direction drives
- Incident and transmitted lights
What comes standard on your tool presetter? What are additional options?
Generally, we offer a broad range of tool presetter and measuring machines from the entry-level class »smile/pilot 2 mT« for a professional start to cost-effective tool measurement, up to the universal inspection and measuring machine »titan« for all precision tools.
All presetter and measuring machines are equipped with the unique ZOLLER image processing technology. Depending on the customer’s requirements, tool presetters are available with different operating technologies: »pilot 2 mT« with up-to-date touch-screen technology and individually configurable interface. »pilot 3.0« offers high functionality and flexibility. Features such as the graphical user interface, the dynamic crosshair and photo real input dialogs have set the standard for user-friendly and intuitive metrology. »pilot 3.0« provides complex measurements on a single user interface. Also the image processing is modular expandable.
ZOLLER presetters are based on a compact, specially alloyed and thermally optimized design, which is robust and work-shop compatible. As already mentioned, also brand products and high-precision spindles are standard on ZOLLER tool presetters.
The main ergonomic features are the adjustable control unit »cockpit« for flexible positioning around the spindle and tool, the one-hand control handle for quick and simultaneous slide adjustment in Z and X direction. Unique features that come standard include the image processing technology with intuitive user interface and the 180-degrees accessibility for high-precision spindle.
Standard measuring methods are the cutting edge inspection and the measurement of length, diameter, radius and angles. Every device can be optionally operated with a CNC control unit. The range of optional measuring methods varies from device to device. The options of measuring methods include, for example, center height measuring, swiveling tool inspection, measuring probe or CNC swiveling optics carrier.
Every presetter is equipped with a SK50 spindle. Spindle options are vacuum clamping, the power-operated »ace« high-precision spindle for maximum precision and quick changes, autofocus, third axis with rotational encoder and the »asza« adjusting device for automatic adjustment of your tools directly on the presetter.
When it comes to data transfer, there are several options. For example, you can choose data communication via „Network“, manual or automatic tool identification or a bar code reader. Customers can choose the data transfer option which fits best in their production process.
How does a presetter enhance productivity?
There are so many benefits to introducing a presetter onto the shop floor or in a tool room setting. You benefit from:
- less machine down-time
- reduced scrap rates
- more efficient processes
- higher process reliability
- better production quality
- overall increased productivity
What are advantages or disadvantages of contact versus non-contact presetters?
The big advantage of non-contact presetters is the ability to bypass the damaging of the measured tool. If you use contact presetters, you may damage the cutting edges, resulting in increased waste and decreased productivity in your production process.
The display of measurement results is much clearer and easier to understand with optical measurement than the display of tactile measurement. The ZOLLER image processing technology for example provides intuitive and easy to operate user interfaces with self-explanatory task buttons. Even untrained employees can do that measuring and setting of standard tools easily.
When looking towards the future, 3D scanning opens new perspectives for the three-dimensional digitalization of workpieces and tools of all kinds and materials. The six axis ZOLLER »3dCheck« CNC machine combines the benefits of optical detection by a 3D sensor with high precision CNC control and fully automated incident light image processing.
What makes your offering unique?
We develop systems with high automation content, with a clear operating structure, which can communicate with other systems via interfaces so operating errors, and thus downtimes, can be avoided.
Example 1: Tool measurement with
»elephant« technology
Standard tools can be measured with »elephant« technology by ZOLLER without data entry and previous knowledge. This technology allows you to measures tools without prior data entry fast, contact-free and with a choice of up to 52 parameters. No training, no previous knowledge required, making this a simple solution.
Example 2: »tool realityCheck«
A typical example is the measurement program specially developed for tool and mold making »tool realityCheck«. Collisions of the tool in the machine lead to expensive and costly production downtime. To avoid this, one uses the known and for a long time proven instrument of the simulation. If, however, the used tools do not correspond to the reality, the simulation is “just a gimmick.” The in-house developed ZOLLER measuring program »tool realityCheck« provides just the right solution for this case.
In the automotive industry adjustable reamers are highly productive, however very demanding tools to be set. ZOLLER provides a user-independent, fully automatic and micron-precision measuring process that guarantees exact accuracy for over 20 years. Different setting procedures are possible.
The danger of cutting damage is completely eliminated since the measurement process run without any contact.
Any final thoughts?
With all of these solutions, the user is equipped to meet future requirements. ZOLLER products are not restricted to standalone solutions. Instead, the focus is on optimization of production processes. These products can already contend today with the increasingly stringent requirements with respect to process reliability, documentation and traceability.
Even the entry-level model »smile« can be extended by fitting the TMS Tool Management Solutions system, so it’s open to all the options available through further development. From entry-level to professional tool presetting and measurement for small companies up to comprehensive and complex measuring requirements, whether single-component or volume production, ZOLLER solutions are complementary and can be interconnected by means of a central tool database. That enables you, whenever new requirements arise, to expand, modify and upgrade whenever you wish to do so.
About the Author
subscribe now
Keep up to date with the latest news, events, and technology for all things metal from our pair of monthly magazines written specifically for Canadian manufacturers!
Start Your Free Subscription- Trending Articles
Automating additive manufacturing

Sustainability Analyzer Tool helps users measure and reduce carbon footprint

CTMA launches another round of Career-Ready program

Sandvik Coromant hosts workforce development event empowering young women in manufacturing

GF Machining Solutions names managing director and head of market region North and Central Americas

- Industry Events
MME Winnipeg
- April 30, 2024
- Winnipeg, ON Canada
CTMA Economic Uncertainty: Helping You Navigate Windsor Seminar
- April 30, 2024
- Windsor, ON Canada
CTMA Economic Uncertainty: Helping You Navigate Kitchener Seminar
- May 2, 2024
- Kitchener, ON Canada
Automate 2024
- May 6 - 9, 2024
- Chicago, IL
ANCA Open House
- May 7 - 8, 2024
- Wixom, MI


